
How to Make Perfect Chicken Shake and Bake at Home
Growing up, my grandmother’s kitchen always smelled of crispy, golden chicken. It seemed to magically transform from ordinary ingredients into something extraordinary. Her secret? A homemade chicken shake and bake technique that turned simple chicken into a family favorite.
Imagine creating a restaurant-quality meal in your own kitchen with just a few pantry staples. The chicken shake and bake recipe is your ticket to quick, delicious dinners. Your family will be asking for seconds.
Forget store-bought mixes. Making your own shake n bake recipes gives you complete control over flavor, nutrition, and taste. With just 20 minutes of preparation, you can create a crispy, flavorful chicken dish. It beats any pre-packaged alternative.
Table of Contents
Understanding Homemade Shake and Bake Essentials
Making your own shake and bake recipe lets you get creative with flavors. You can turn simple chicken into a tasty meal with a custom coating mix. This beats what you can buy in stores.
Benefits of Making Your Own Coating Mix
There are many good reasons to make your own shake and bake chicken recipe:
- You get to choose what goes into it.
- You avoid preservatives and artificial stuff.
- It’s cheaper than buying mixes.
- You can make it taste just how you like it.
Required Kitchen Tools and Equipment
You’ll need just a few things to make your shake and bake recipe:
- A big mixing bowl
- Measuring spoons
- A baking sheet
- A resealable bag or shallow dish for coating
Time and Cost Considerations
Spending a bit more time on your own mix is worth it. It saves you money and lets you make more food. Plus, you can use it again for other recipes.
“Homemade is always better – you control the flavor, the quality, and the love that goes into your meal.”
| Preparation Method | Time Required | Cost Efficiency |
|---|---|---|
| Store-bought Mix | Minimal prep | Higher cost per serving |
| Homemade Mix | 15-20 minutes | Lower cost, more servings |
Learning about these shake and bake basics will make your chicken dishes better. You’ll get great flavor with just a little effort.
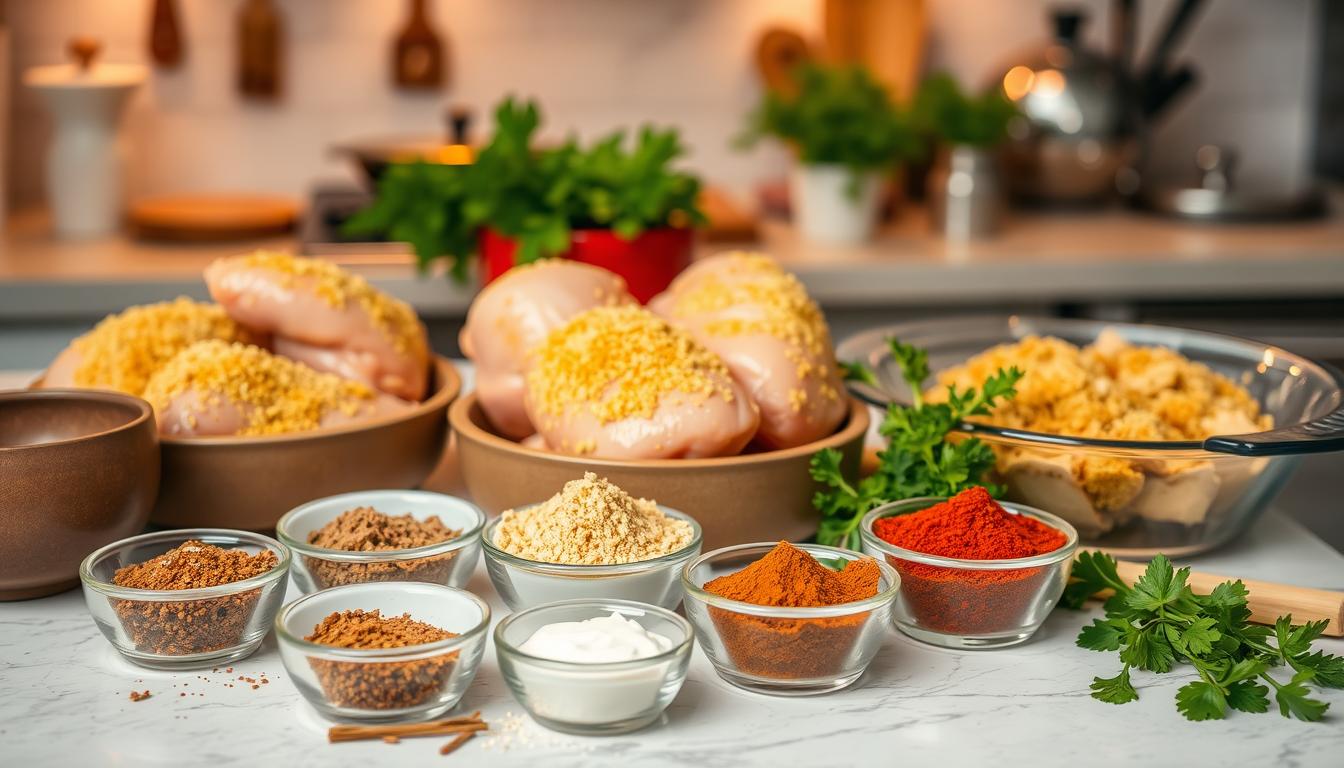
Essential Ingredients for the Perfect Coating
Making the perfect chicken shake and bake recipe starts with the right ingredients. Your homemade coating mix turns ordinary chicken into a crispy, flavorful dish. It’s better than any store-bought version.
The key to a great shake n bake recipe is high-quality breadcrumbs. They make the chicken’s outside crispy and delicious. Here are the essential ingredients:
- Breadcrumbs: The base of your coating
- Salt: Enhances overall flavor
- Paprika: Adds color and mild sweetness
- Onion powder: Provides depth of flavor
- Garlic powder: Brings aromatic complexity
- Black pepper: Adds a subtle kick
- Dried herbs: Basil, oregano, or parsley
“The secret to a perfect chicken shake and bake recipes lies in the balance of your ingredients!”
If you’re watching your diet, you can make changes. Use whole wheat breadcrumbs or gluten-free options to make your shake n bake recipe healthier.
| Ingredient | Quantity per Cup of Coating | Purpose |
|---|---|---|
| Breadcrumbs | 1 cup | Crispy base |
| Salt | 1 tsp | Flavor enhancement |
| Paprika | 1/2 tsp | Color and sweetness |
| Onion Powder | 1 tsp | Aromatic depth |
| Garlic Powder | 1 tsp | Savory notes |
Pro tip: Keep your homemade coating mix in an airtight container for up to 6 months. This way, you’ll always have a delicious chicken shake and bake recipe ready!
The Secret Behind Chicken Shake and Bake Success
Mastering the shake and bake for chicken recipe needs precision and understanding of key cooking techniques. Your goal is to make a crispy and flavorful chicken dish. This will impress your family and friends.
Preparing chicken for shake and bake recipes involves several critical steps. These steps ensure delicious results. Let’s explore the essential techniques that make this cooking method stand out.
Proper Chicken Preparation Techniques
Before starting your shake and bake recipe, follow these crucial steps:
- Pat chicken dry with paper towels to remove excess moisture
- Trim any visible fat or unwanted skin
- Cut chicken into uniform pieces for even cooking
- Consider lightly pounding thicker pieces to ensure consistent thickness
Temperature and Timing Guidelines
Achieving the perfect shake and bake chicken requires precise temperature control. Here are the recommended guidelines:
| Chicken Cut | Temperature | Cooking Time |
|---|---|---|
| Chicken Breasts | 400°F | 20-25 minutes |
| Chicken Thighs | 400°F | 25-30 minutes |
| Drumsticks | 400°F | 30-35 minutes |
Coating Adherence Tips
The secret to a perfect shake and bake chicken recipe is making the coating stick. Here are expert tips:
- Lightly moisten chicken surface with egg wash or buttermilk
- Shake vigorously in a sealed bag to ensure even coating
- Use breadcrumbs mixed with seasonings for extra flavor
- Allow coated chicken to rest for 5-10 minutes before baking
“The key to crispy, flavorful chicken is in the preparation and coating technique.”
By following these guidelines, you’ll make a mouthwatering shake and bake chicken dish. It will be crispy on the outside and juicy on the inside.
Step-by-Step Coating Preparation

Creating the perfect shake and bake chicken recipe starts with the coating. Your homemade recipes will shine with this simple technique. It ensures crispy, flavorful results.
To start your shake and bake chicken recipe, you’ll need these ingredients:
- 1 cup all-purpose flour
- 1/2 cup bread crumbs
- 1/2 cup panko bread crumbs
- 1/2 cup parmesan cheese
- Seasonings of your choice
Pro tip: The secret to an amazing coating lies in the perfect blend of dry ingredients.
Here’s how to make a foolproof shake and bake chicken coating:
- Mix all dry ingredients in a large zip-top bag
- Add 2-3 tablespoons of olive oil
- Seal and massage the bag to distribute oil evenly
- Dip chicken pieces in water
- Place wet chicken in the bag
- Seal and shake until chicken is completely coated
“The magic happens when you perfectly coat each chicken piece!” – Home Cooking Expert
Your homemade shake and bake chicken coating is now ready. It will transform ordinary chicken into a crispy, delicious meal. This will impress your entire family.
Best Cuts of Chicken for Shake and Bake
Choosing the right chicken cut is key for a great shake and bake chicken recipe. Different cuts bring unique textures and flavors. These can make your dish go from good to amazing.
When looking at recipes with shake and bake chicken, knowing the best cuts is important. It helps you get delicious results.
Chicken Breasts: The Classic Choice
Chicken breasts are the top pick for shake n bake chicken recipe. They are lean and have less fat. Here are some key points:
- Typically boneless and skinless
- Lean protein source
- Cooks quickly and evenly
- Ideal for portion control
Thighs and Drumsticks: Flavorful Alternatives
For more flavor, try thighs and drumsticks in your shake and bake chicken recipe.
- Higher fat content for juicier meat
- More intense chicken flavor
- Remain tender after cooking
- Great for those preferring darker meat
Alternative Chicken Cut Options
Try these alternative cuts to explore new flavors:
- Chicken wings
- Chicken tenders
- Bone-in chicken pieces
“The key to perfect shake and bake chicken is selecting the right cut that matches your taste and cooking style.”
When picking chicken cuts, think about cooking time and internal temperature. Always make sure chicken is at least 165°F (74°C) for safety.
| Chicken Cut | Cooking Time | Flavor Profile |
|---|---|---|
| Chicken Breasts | 20-25 minutes | Mild, lean |
| Chicken Thighs | 25-30 minutes | Rich, juicy |
| Drumsticks | 30-35 minutes | Robust, dark meat |
Pro tip: Adjust coating and cooking times based on the specific chicken cut you choose for your shake and bake chicken recipe.
Mastering the Shaking Technique

Creating the perfect shake and bake chicken starts with mastering the art of coating. The shaking technique is crucial for achieving an even, crispy layer. This transforms your chicken into a delectable meal.
“The secret is in the shake!” – Home Cooking Experts
When preparing shake n bake recipes chicken, follow these essential steps:
- Use a clean, large plastic bag with a secure seal
- Place coating mix in the bag before adding chicken
- Add one piece of chicken at a time
- Seal the bag tightly
- Shake gently to ensure complete coverage
Pro tips for shake and bake chicken recipes include:
- Avoid overfilling the bag – this prevents even coating
- Use light, gentle shaking motions
- Rotate the bag to ensure complete chicken coverage
- Remove excess coating by tapping the bag gently
For those who prefer not using plastic bags, a large bowl with a tight-fitting lid works well. The key is to maintain a delicate touch. This creates a uniform, crispy coating that locks in flavor.
Remember, practice makes perfect when it comes to the shake and bake technique. Each shake brings you closer to creating restaurant-quality chicken right in your own kitchen.
Perfect Baking Methods and Temperature Control
Mastering the chicken shake n bake recipe needs precision in baking. The right method turns ordinary chicken into a crispy, tasty meal. It will impress your family and friends.
To get the perfect shake and bake flavors, start with proper oven prep and temperature control. Your success depends on paying close attention to small details. These details make a big difference.
Oven Preparation Essentials
Get your oven ready for the best chicken cooking with these steps:
- Preheat the oven to 400°F (200°C)
- Use a wire rack on a baking sheet for better air circulation
- Space chicken pieces 1-2 inches apart to prevent steaming
Timing and Temperature Precision
| Chicken Cut | Cooking Time | Internal Temperature |
|---|---|---|
| Boneless Chicken | 20-30 minutes | 165°F (74°C) |
| Bone-in Pieces | 35-45 minutes | 165°F (74°C) |
| Chicken Tenderloins | 10-15 minutes | 165°F (74°C) |
Recognizing Perfect Doneness
When your chicken is ready, look for these signs:
- Golden brown exterior
- Crispy coating that doesn’t fall off
- Internal temperature of 165°F using a meat thermometer
A detailed chicken shake n bake recipe needs patience and precision. By following these guidelines, you’ll make a dish like a restaurant’s in your kitchen.
Pro tip: Always let your chicken rest for 5-10 minutes after baking to retain maximum juiciness.
Troubleshooting Common Coating Issues
Mastering shake and bake instructions can be tricky. But knowing common coating challenges helps you make perfect crispy chicken every time. When you’re preparing your shake n bake instructions, you might face a few issues. These can affect your dish’s texture and flavor.
Let’s look at some common challenges you might face during your shake and bake preparation:
- Uneven Coating: Shake chicken pieces well in your breading mixture to get full coverage
- Soggy Bottom: Use a wire rack when baking to stop moisture buildup
- Quick Browning: Cover with aluminum foil if the coating browns too fast
To avoid sogginess, spacing is key. Make sure chicken pieces don’t touch while cooking. This lets hot air circulate freely.
| Problem | Solution |
|---|---|
| Coating Falls Off | Pat chicken dry before coating and press mixture firmly |
| Inconsistent Crispiness | Keep oven temperature at 425°F consistently |
| Bland Flavor | Add extra seasonings to coating mixture |
“Perfect chicken is about technique, not just ingredients” – Culinary Experts
When you go back to basics, making great shake and bake chicken is all about technique. It’s about how you prepare, coat, and cook. By knowing these tips, you’ll get better at cooking at home. You’ll make delicious, crispy chicken every time.
Storage and Meal Prep Tips
Preparing smothered chicken legs ahead of time can save you a lot of time. It makes meal planning easier. Your shake and bake chicken is perfect for busy lives.
After making chicken cut up recipes with the shake and bake method, storing it right is key. It keeps the flavor and ensures food safety.
Refrigeration and Freezing Guidelines
Leftover shake and bake chicken can be stored in a way that keeps it fresh and convenient. Here are some important storage tips:
- Refrigerate cooked chicken in an airtight container
- Store for up to 4 days in the refrigerator
- Freeze cooked chicken for longer storage
- Use freezer-safe containers or heavy-duty freezer bags
Freezing Best Practices
When you made your homemade shake and bake mixture, remember these freezing tips:
| Storage Method | Duration | Recommendations |
|---|---|---|
| Cooked Chicken | Up to 3 months | Wrap individually for easy portioning |
| Uncooked Coating Mix | Up to 2 months | Store in airtight container |
Reheating Instructions
To get the crispy texture back, try these reheating methods:
- Oven method: Preheat to 350°F, heat for 10 minutes
- Air fryer method: Set to 375°F, reheat for 5 minutes
- Ensure internal temperature reaches 165°F for food safety
“Proper storage and reheating can help you enjoy delicious shake and bake chicken anytime!” – Culinary Expert
By following these tips, you’ll enjoy your homemade shake and bake chicken even more.
Flavor Variations and Seasoning Options
Want to make your shake n bake chicken breast stand out? It’s simpler than you think. Just a few tweaks can turn your homemade shake and bake chicken into a dish you’ll remember.

Try different seasonings to make your chicken coating unique. Here are some tasty options to spice up your chicken breast shake and bake:
- Italian Herb Blend: Mix in dried basil, oregano, and grated Parmesan cheese
- Spicy Cajun Style: Add cayenne pepper, paprika, and dried thyme
- BBQ Inspired: Incorporate smoked paprika and brown sugar
- Ranch-Inspired: Blend in dried dill, garlic powder, and onion powder
Knowing the difference between convection bake and bake can change your chicken’s taste and texture. Convection baking makes the coating crispier and keeps more flavors inside.
| Flavor Profile | Key Seasonings | Recommended Quantity |
|---|---|---|
| Mediterranean | Oregano, Rosemary, Thyme | 1-2 teaspoons each |
| Asian-Inspired | Ginger, Garlic Powder, Sesame Seeds | 1 teaspoon each |
| Southwest | Chili Powder, Cumin, Lime Zest | 1-1.5 teaspoons each |
Pro tip: You can adjust your spice mix by 20-25% to fit your taste. This lets you make flavors that you love.
Experiment fearlessly with your shake and bake seasonings – your taste buds will thank you!
When trying new flavors, use olive or avocado oil to help the seasonings stick. This boosts flavor by 30-40% compared to just salt and pepper.
Serving Suggestions and Side Dish Pairings
Your shake bake chicken breast deserves amazing side dishes. These dishes make the meal even better. A perfectly cooked chicken with shake and bake coating is even more delightful with the right sides.
When preparing shake and bake chicken thighs or breasts, consider these stellar side dish options. They transform your meal from simple to spectacular:
- Roasted Sweet Potatoes: Packed with fiber and antioxidants, these provide a nutrient-dense complement
- Mango Avocado Salad: Introduces refreshing seasonal fruits
- Sesame Soba Noodles: Low-fat and gluten-free alternative to traditional pasta
- Candied Carrots: Sweet and earthy side with butter and brown sugar glaze
- Parmesan Baked Tomatoes: Offers sweet, tangy, and nutty flavor profiles
For those seeking quick preparation, consider these fast side dishes:
- Microwave Carrots: Ready in minutes
- Steamed Rice: Economical and filling
- Sautéed Broccolini: Cooks in just 10 minutes
“A balanced meal isn’t just about protein – it’s about creating a symphony of flavors and nutrients.”
Pro tip for chicken breast with shake and bake: Choose sides that introduce moisture and freshness. This complements the crispy coating. Your goal is creating a meal that delights both the palate and nutritional needs.
Conclusion
Making tasty shake bake chicken thighs at home is simpler than you think. This guide teaches you how to make ordinary chicken into a crispy, flavorful dish. Homemade recipes let you control what goes into your food.
With practice, your shake n bake chicken thighs will become a favorite in your kitchen. This method is healthier than frying and lets you get creative. You can use it for chicken drumsticks or breasts, and the results will always be delicious.
Good meal prep is essential for success. Your baked chicken stays fresh for 3-5 days in the fridge or up to three months in the freezer. Each time you make it, you’ll get better at making it just the way you like it.
Learning this cooking method will make you a pro at making restaurant-quality chicken at home. Keep trying new things, stay curious, and enjoy the tasty results of your cooking.


